Monday, November 1, 2010

Wow, where has the time gone!


I can't believe it's been 3 months since my last post! So much has happened since then, and I hope to do a good recap this week. But for now, I wanted to let everyone know about my very first Solo Exhibit!!

I went to set it up this morning, and it looks great! I'll be exhibiting 20 of my latest oil paintings, and I'm so excited! The exhibit, titled "Shades of Light" takes place at the University of Maine Fort Kent, in the Blake Library Gallery. It will be on display from November 2 through November 29.

I'm also having an Opening Reception this Friday, from 4-6pm. I really can't wait, as it will give me an opportunity to meet new locals. I've only been in the area for 4 years - this will be such a great way to get my name out here!  :)

Read the full story on the University's website

Tuesday, July 20, 2010

Renovations Step 2: Replacing the floors... DONE!

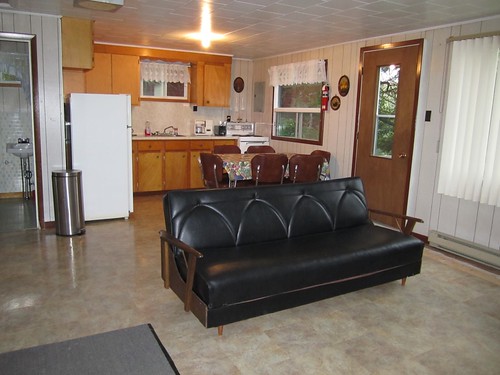
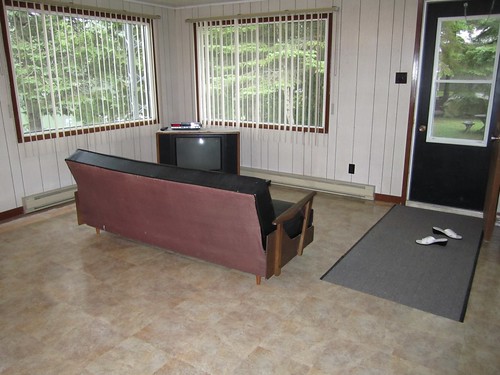
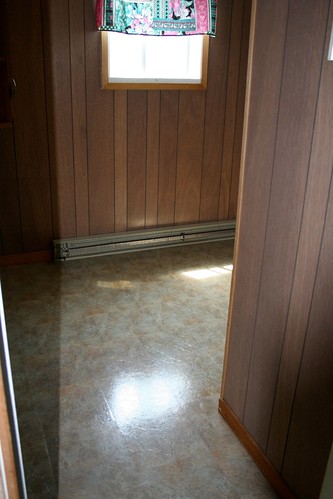
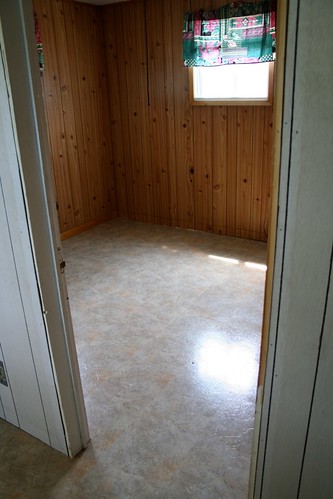
Well, we actually finished these a few weeks ago, but only got around to taking new photos this past weekend. I love how everything turned out! And although these are still somewhat temporary (I'll be putting in hardwood floors eventually...), this will certainly get me by for a few years.

Here are the before/after shots of this room... pretty dramatic! :)

BEFORE - Studio Area

Kitchen

AFTER - Studio Area

AFTER - New floors!

BEFORE - Studio Area, corner view

Main entryway


AFTER - Studio Area, corner view

AFTER - New floors!

I'm really excited to move in! We actually have another renter arriving this weekend, and they're staying for 3 weeks. But after they're gone, it's ALL MINE!! I'll be spending the rest of the year painting walls, fixing some plumbing, and replacing a few windows. Once that's done, I can start moving my stuff!!

Can't wait!  :)

Sunday, June 20, 2010

Renovations Step 2: Replacing the floors, Part 2

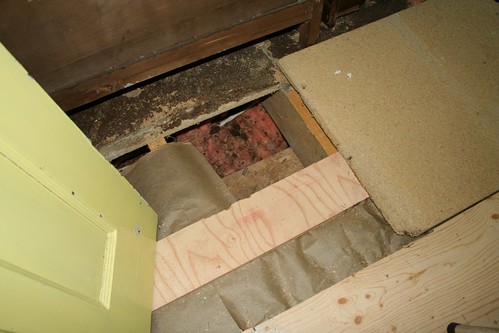
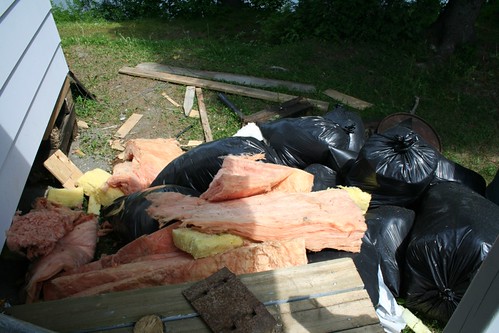
After lifting a few sections of the old particle board, it's obvious that we've had many little visitors here over the years. The little critters had made pathways alongside the insulation, which packed down so flat in many areas, that it just had to be replaced. We also found lots and lots of mouse droppings, pine cones, acorns, etc... obviously this was their home :)

Surprise! We've had some visitors over the years...

Huge pile of old insulation

So we started doing just that - replacing the insulation in spots that were bare, vacuuming all the debris left behind, and adding a vapor-barrier on top. This was no easy task... but we were lucky that my Dad was visiting from Toronto for a few weeks (at my request, since we really needed his help here). Him and my husband tackled the floors, which was completed in less than 2 weeks. Hooray!

There! Now we're ready for some plywood! There are some areas where we just couldn't take out the particle board (for various reasons). Below is a photo showing the old next to the new:

Old subfloor vs. new plywood :)

Now, my goal is to be able to move in by this Winter. I don't necessarily care right now if not everything is perfect or even pretty. I just want to move in. And seeing that I can't make up my mind on flooring, and we have renters arriving soon, I wanted something I could install easily and cheaply. I also wanted something thin so that I can put real wood on top of it, whenever I decide to.

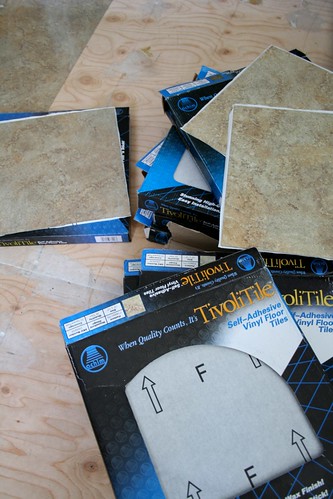
We opted for peel-and-stick vinyl tiles. These things are AWESOME! I shopped around to find a pattern that was decent, but still within my cheap requirement. I found these beauties at the local Family Dollar. At $12 a box, they were a steal! So it cost me less than $300 to redo the entire building. Can you say BARGAIN!?

These are super-easy to work with

Seriously, in less than one day we had 2 rooms covered. Now that's progress! Here are the before/afters of both rooms:

BEFORE - Storage Room

Room #2

AFTER - Storage Room

AFTER - storage room

BEFORE - Office Space
(ignore the gross, stained mattress... it was there when we bought the place!)


Room #1


AFTER - Office Space


AFTER - My "office"


Now these before shots aren't terrible... the pattern of these rooms' floors weren't bad. The main room is a different story. Once that's replaced, it'll make a huge difference in there.

Friday, June 18, 2010

Renovations Step 2: Replacing the floors, Part 1

Alright - now we're getting somewhere!

We knew how warped and soft the floors were, but didn't know exactly why. Surely, it must just be all rotten under there, so let's find out.

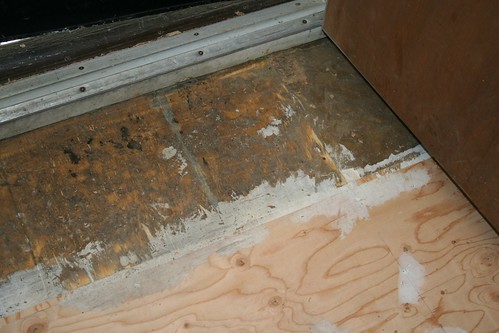
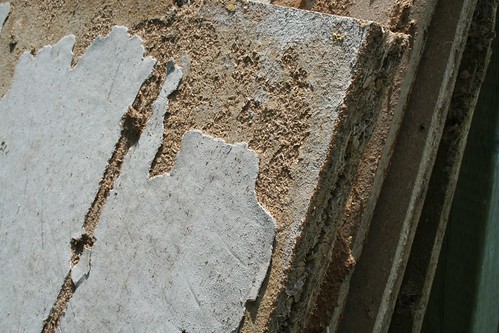
Welcome to Surprise #1: The subfloors were made of particle board. Yes, you read correctly.

The junk subfloors that were there

If you're not aware of the differences between particle board and real plywood, this junk you see above expands and warps with humidity. We live on a lake. Why on earth would you put that on your floors?!? The good news is that we know what the problem was. Now we needed to decide: do we simply add a layer of plywood on top of this stuff, or rip it all out and replace them? Obviously replacing them is the best solution.

That is, until we peeled away the old linoleum floors. Little did we know, they used 3" nails to fasten the floors, not screws. As if having to chisel away and remove every single nail was grueling enough, we then enter the 2 small rooms.

Again, peeled away the vinyl floors, and what do we find? The glued piece of the vinyl stays stuck. Everywhere. Which means all the nails are hidden. Which means we now have to actually chisel away that layer of white (see above) in order to even get to the nails! Argh! Luckily, my father-in-law stopped in just in time... he volunteered to do this part! :)

Whew. Well now that's done. Surely it'll be smooth sailing now!

Thursday, June 17, 2010

Renovations Step 1: Paint and level the structure

This camp has taken a beating over the years. The paint was severely peeling, the supports holding the building up were starting to rot and sink into the ground, and the floors were warped and very soft in many spots.

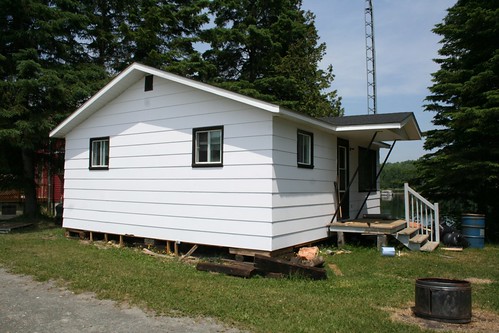
Luckily, painting the camp was fairly easy. I kept it white (for now). I wish I would've taken some more recent "before" shots, but it was peeling really, really badly! A good coat of primer, then another coat of high quality white paint, and I was done.

BEFORE:

Outside

AFTER:

AFTER - Painted the outside

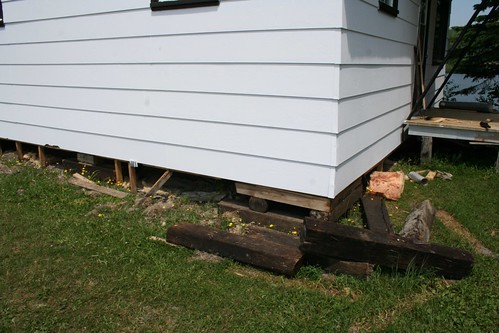
We debated whether to keep the current supports, or replace them with poured or blocks of concrete. When we took off the skirting all around, we found that most of the "railroad ties" were in really great shape! They've been solid all these years, why mess with what works?

There were a few, however, that were rotten. A nearby friend had spare railroad ties (I don't even know how people collect these things...), so we jacked up the camp, little by little, and replaced the ones that need it.

We also had to lift & level the place

Then we got to the back side: one of the main support beams was rotten... all. the. way. through. NOT fun. That'll be a project for a later date (when we have a real contractor over).

So for the most part, those two big things are done. The camp looks so much better with a fresh coat of paint, and I feel a bit safer knowing that I'm not going to sink into ground. :)

Wednesday, June 16, 2010

Studio move and renovations!

Sorry I haven't been posting much; I've been a bit busy! Busy "how", you ask?

Well, shortly after we moved to our new home on the lake, the adjacent property came for sale. We loved the spot and it would give us extra lake frontage. Yes, it had a camp on it... but we didn't care. We were buying it for the lot.

Outside

Then I started painting more and more, and my tiny little office upstairs was getting out of control. We got estimates to build an addition (which was a lot of $$$), then realized we had the "addition" right next door! All it needed was a little TLC!

We kept delaying the project, since it wasn't really, really needed (yeah right!!) and after all, my work and painting were still getting done, right? True, but it was just time. I had completely outgrown my space, and was finding it harder and harder to be creative. I needed a change!

So that's it! That's what I've been busy doing... renovating my future office & studio! Unfortunately (or fortunately!), we're renting it for a few weeks this summer. So the first big rush is to get the floors in better shape. It's really warped right now (and ugly!). We have less than 3 weeks left until the first renters arrive, so it has to get done!

I'll be posting regular updates on our progress (which we've already started), so make sure to check back soon.

Wednesday, May 5, 2010

SOLD - "Winter Birches" - 18 x 24"


If you've seen some of the handmade items in my shop, you'll notice that I have a love of all things Birch! There's something about those long, skinny white trees that is so calming. I love how the knots in the bark look like eyes... watching us as we roam through the forest :)

I don't often paint this large, but when I took the reference photos for this piece, I knew right away that it should be painted BIG! The bold, contemporary design look even better with the frame. It looks amazing on any wall!

SOLD

Monday, May 3, 2010

SOLD - "Wild Daisies" - 8 x 16"


SOLD 

It's been a while since I've painted a floral, and when I saw these beauties flowing in the wind one day, I thought they'd be perfect for my painting. I love how they seem to be reaching up towards the sun!


Saturday, March 20, 2010

SOLD - "The Cuddling Pair" - 10 x 10"


SOLD 

After having worked on some recent Landscape paintings, I was itching to get back into Still Lifes. Luckily, I always have fruits or vegetables on hand, since I'm kind of a health nut!

I really love painting pears; they're so curvy and sensual, and come in so many colors. Instead of the usual green Anjou, I thought I'd go with these gorgeous golden Bosc pears. They not only taste delicious, but their longer shape and curly stems were just perfect for this painting!

I love how the stems are intertwined... they look comfortable and in love! :)


Wednesday, March 17, 2010

SOLD - "The Odd Couple" - 8 x 16"


SOLD 

This is what I love the most about Still Life painting - the chance for me to tell a little story. In this case, I'm adding my own social commentary using Lemons and Limes, but the viewer can interpret this scene any which way they'd like. Are they an interracial or gay couple? An older gentleman with a younger woman? And which one of these IS the "odd couple", anyway? You decide!


Friday, March 5, 2010

California paintings

We had the luxury of spending the holidays in sunny California this year, which was a nice change from the cold, white north!

During our stay, we managed a quick trip along the coast, also known as the scenic Pacific Coast Highway (PCH). It's really one of my most favorites places, second after Ireland. I love the huge hills and valleys, and the vast changes between desert and rocky coastlines.

We had also been there about a decade earlier, and after looking through my plethora of photos for inspiration, I settled on these two to paint:


"Pacific Edge", 8 x 10" Oil on panel


"California Coast", 11 x 14" Oil on canvas

I don't paint Landscapes very often, but I had a great time working on these. I hope to paint more of them in the near future (I still have lots of photos to go through!).

Thursday, March 4, 2010

SOLD - "Living on the Edge" - 14 x 18"

As promised, I'll be posting some of my latest works that hadn't yet made it to my blog. Here's one of them, titled "Living on the Edge".


SOLD 

I started this painting last summer; it was the piece I was working on during a local Art Show, and had really struggled to finish it that weekend. I love going to this show... it's outdoors, and you get to meet your collectors face-to-face, which is always great! Plus, we usually set up our easels and paint while folks are admiring and shopping... something I always find interesting myself when I go to shows. I love seeing how each artist works.

However for me, being the social butterfly that I am, I almost never get to paint during these events because I'm too busy talking to everyone! And this is one of those paintings... started, but never finished. I finally brought it back to my studio and managed to finish it months later. And I'm so pleased with the final result!

The original photo (taken by my husband during a past trip to Tijuana, Mexico) was very dull and lifeless. I love bringing my sense of color to such drab scenes. That's where us artists really get to be artists :)


Wednesday, March 3, 2010

It's been a while...

It's been a very, very busy last couple of months, to say the least. Which explains the lack of updates on my blog! With the launch of my brand new website (finally, after 10+ years!), lots of interesting work projects, and the holidays (spent in sunny California!), it's no wonder I haven't been here much.

But it's a new year, filled with new goals! One of them, not surprisingly, is to paint more. Not only paint more, but paint better. I've semi-decided to start following the recent trend of "daily paintings". Now with my busy schedule, I don't see this happening (and no, I'm not a pessimist... just being realistic!). If I can manage to squeeze in a new (small) painting every 2 days or so, that would be a great start (I already stocked up on some small canvases during my last trip to Boston!)

Just go to Google and search for "daily painting" or "daily painter", and you'll no doubt find hundreds of artists out there doing this exact thing. What does Daily Painting do for an artist? The way I see it, it's a good way to hone your observation skills, and not worry about every single detail of a painting. My goal is to become a bit more "painterly" in my technique, and I feel like this would help get me started. My favorite daily painters, by the way... are Carol Marine, Michael Naples, and Qiang Huang, just to name a few. And it's really hard to just name a few :)

These small paintings are not meant to replace my usual work. And I have a number of new paintings which need to be added here - hopefully within the next few days. So keep an eye out!
Related Posts Plugin for WordPress, Blogger...